Routing in Angular 2 with ASP.NET Core

In my previous post, I explained how to configure Angular 2 with TypeScript in a ASP.NET Core project created with Visual Studio. The idea was to explain the minimum steps that you need in order to have a basic application working. However, you will generally create more complex apps using Angular, for example, a Single Page Application (SPA). That kind of applications, generally take advantages of the routing features that are incorporated in Angular nowadays. In this post, I will show you how to configure routing in an Angular 2 application with ASP.NET Core.
First of all, lets configure the Angular 2's Router component in the site. The Router component is not part of the Angular 2 core, it's in its own library which you can find as part of the bundles included when installing the npm package. In order to make it available in the application, you need to include the script in the layout. To do so, open the _Layout.cshtml file located at Views/Shared/ and add the following code right after the script element that loads Angular 2 core.
<environment names="Development">
  <script src="~/lib/npmlibs/angular2/router.dev.js"></script>
</environment>

<environment names="Staging,Production">
  <script src="~/lib/npmlibs/angular2/router.min.js"></script>
</environment>
Now, in the same file, we must add a <base> element tag to make pushState routing work. The browser also needs the base href value to prefix relative URLs when downloading and linking to css files, scripts, and images. Add this tag after the <head> tag using as value for the href attribute the base url, which will usually be "/". Note that if you don't use the application root for your Angular app, you'll need to update this value accordingly.
<html>
  <head>
    <base href="/" />
    <!-- ... -->
  </head>
</html>
By doing this, we added the routing component's requirements to the application. Now, it's time to configure your Angular 2 application to use it. First of all, add the Router providers to the bootstrap, by importing the ROUTER_PROVIDERS from angular2/router and passing it to Angular's bootstrap function.
import { bootstrap } from 'angular2/platform/browser';
import { AppComponent } from './app.component';
import { ROUTER_PROVIDERS } from 'angular2/router';

bootstrap(AppComponent, [ROUTER_PROVIDERS]);
Now, open the app.component.ts file and import RouteConfig and ROUTER_DIRECTIVES from angular2/router. Additionally, update the component's template to use the routerLink directive and the router-outlet component. Moreover, add the RouterConfig attribute to configure the links.
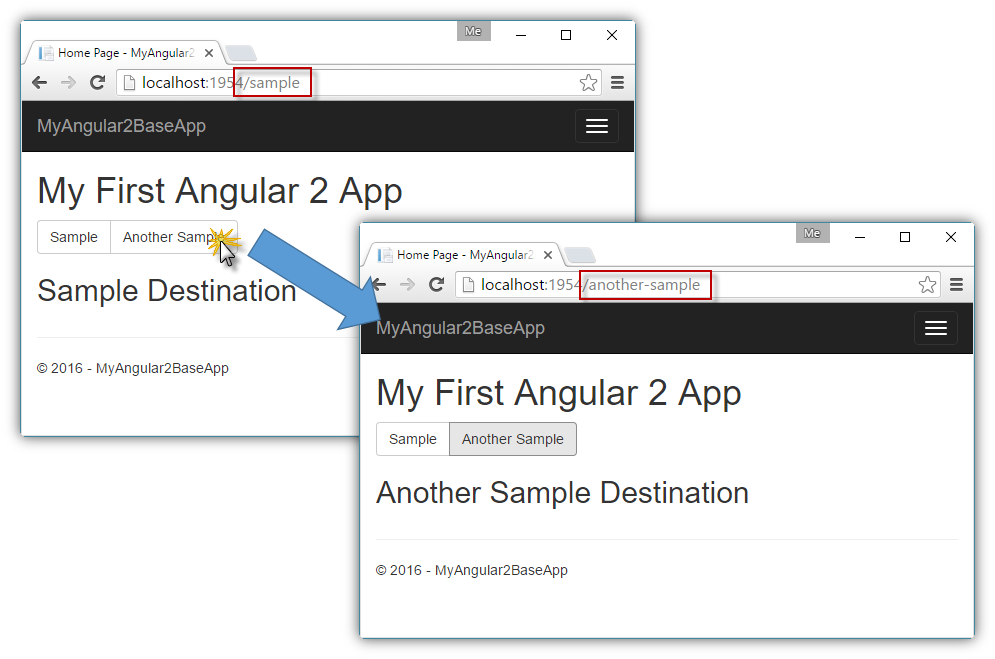
The following code shows an example that uses two buttons to redirect to SampleComponent and AnotherSampleComponent components, using the first one as default and redirecting any other urls to that path. My idea is not to explain Angular 2 routing in this post, just focus on the structure needed to integrate it with ASP.NET Core, so if you need more information at this point, you can try on the official documentation.
import {Component} from 'angular2/core';
import { RouteConfig, ROUTER_DIRECTIVES } from 'angular2/router';
import { SampleComponent, AnotherSampleComponent } from './sample.components';

@Component({
selector: 'my-app',
template: \`
  <h1>My First Angular 2 App</h1>
  <nav class="btn-group" role="group" aria-label="...">
    <a href="" [routerLink]="['Sample']" class="btn ban-default">Sample</a>
    <a href="" [routerLink]="['AnotherSample']" class="btn ban-default">Another Sample</a>
  </nav>
  <router-outlet></router-outlet>
  \`,
  directives: [ROUTER_DIRECTIVES]
})
@RouteConfig([
  { path: '/sample', name: 'Sample', component: SampleComponent, useAsDefault: true },
  { path: '/another-sample', name: 'AnotherSample', component: AnotherSampleComponent },
  { path: '/\*\*', redirectTo: ['Sample'] }
])
export class AppComponent { }
If you run the solution now, you will be able to navigate using the buttons without any issues. The following image shows you the experience.

However, you can notice that if you refresh your browser or navigate to a specific path, you will not be able to get to the same page. That's because in that scenario, the url is first resolved by the server as you are performing a direct request to it and the front-end (the Angular part) can't handle it at this point. The solution for this is to add a new route configuration in ASP.NET Core.
In the Startup.cs file, locate the app.UseMvc method call and add a new route using {*url} as template and redirecting to the controller that you are using for your Angular 2 application.
app.UseMvc(routes =>
{
  routes.MapRoute(
    name: "default",
    template: "{controller=Home}/{action=Index}/{id?}");

  routes.MapRoute(
    name: "spa-fallback",
    template: "{\*url}",
    defaults: new { controller = "Home", action = "Index" });
});
The problem with this rule is that you will not have 404s for non-existent assets like images, css or js files as the SPA HTML will be returned instead. To avoid this, you can install the Microsoft.AspNet.SpaServices NuGet package and replace the spa-fallback with a call to the MapSpaFallbackRoute method. This will match all the request that doesn't appear to have a filename extension (defined as 'having a dot in the last URI segment'). However, it means requests like /customers/isaac.newton will not be mapped into the SPA.
app.UseMvc(routes =>
{
  routes.MapRoute(
    name: "default",
    template: "{controller=Home}/{action=Index}/{id?}");

  routes.MapSpaFallbackRoute("spa-fallback", new { controller = "Home", action = "Index" });
});
With this, you have everything you need to create complex Angular 2 applications using ASP.NET Core as backend. You can find the full code in my Angular2ASPNETCoreBaseApp repository at the routing-sample branch.
Updated: I created a new post explaining how to configure Angular2's Http service and ASP.NET to consume the MVC APIs.

