Angular 2 Http with ASP.NET Core APIs

In my previous post, I explained how to configure routing in an application with Angular 2 and ASP.NET Core (if you need more information about how to configure a project with Angular 2 using TypeScript and ASP.NET Core in Visual Studio you can read the first post). This was one of the key elements to create Single Page Applications (SPA). Another key element is to consume REST APIs from your Angular 2 application, so now is the time to show you how to configure your project to use the Angular 2 Http service in ASP.NET Core in order to be able to do so.

First of all, lets configure the Angular 2 Http service in the site. The Http service, as well as the Router Component, are not part of the Angular 2 core, they are in their own libraries which you can find as part of the bundles included when installing the npm package. In order to make the Angular 2 Http service available in the application, you need to include the script in the layout in the same way you did with the router library. To do so, open the _Layout.cshtml file located at Views/Shared/ and add the following code right after the script element that loads Angular 2 core.
<environment names="Development">
  <script src="~/lib/npmlibs/angular2/http.dev.js"></script>
</environment>

<environment names="Staging,Production">
  <script src="~/lib/npmlibs/angular2/http.min.js"></script>
</environment>
By doing this, we added the http component's requirements to the application. Now, its time to configure your Angular 2 application to use it. First of all, add the http providers to the bootstrap, by importing the HTTP_PROVIDERS from angular2/http and passing it to Angular's bootstrap function.
import { bootstrap } from 'angular2/platform/browser';
import { AppComponent } from './app.component';
import { HTTP_PROVIDERS } from 'angular2/http';

bootstrap(AppComponent, [HTTP_PROVIDERS]);
Now, you need to update your custom components to make use of the Angular 2 Http service. In a real project, you should create an injectable service that consume the Http service in order to make it easier to test and update. However, in this post I will update the main component in order to make things easier to follow.
First, you need to import Http and Response from angular2/http. You will also need to import rxjs/Rx because of the map function that I used.
Now, update the template to show a list of values using the ngFor directive and add the values property to the AppComponent class. Implement OnInit, in order to load the values when the component trigger the init event. Finally, add a constructor passing private http: Http as parameter, in order to have access to an instance of Angular 2 Http that is automatically injected.
In the ngOnInit method is where you will be performing a GET request to the /api/values endpoint. To do this, you just need to call the get method of the http instance passing the endpoint as parameter: this.http.get("/api/values"). After doing this, you will map the result (which is an observer) to json by appending .map((res: Response) => res.json()). Finally, you will use the subscribe method to do something when the values are received. In this case, you will assign the values to the property that you are showing in the templates (in my case values).
import {Component, OnInit} from "angular2/core";
import {Http, Response} from "angular2/http";
import "rxjs/Rx";

@Component({
  selector: "my-app",
  template: `
  <h1>My First Angular 2 App</h1>
  <ul>
    <li \*ngFor="#value of values">
      {{value}}
    </li>
  </ul>
  `
})
export class AppComponent implements OnInit {
  private values: string[];

  constructor(private http: Http) {
  }

  ngOnInit() {
    return this.http.get("/api/values")
    .map((res: Response) => <string[]>res.json())
    .subscribe((data:string[]) => this.values = data);
  }
}
Now that you have everything in place in the front end, you need to configure the backend. First, open the Startup.cs file and locate the ConfigureServices method. In that method update the AddMvc call appending a call to the AddJsonOptions method to configure the JSON serializer to use camelCase and including default values to easily parse the results in the front end. In order to do this, add the following code as well as the missing using statements (Newtonsoft.Json.Serialization and Newtonsoft.Json).
services.AddMvc().AddJsonOptions(options =>
{
  options.SerializerSettings.ContractResolver = new CamelCasePropertyNamesContractResolver();
  options.SerializerSettings.DefaultValueHandling = DefaultValueHandling.Include;
  options.SerializerSettings.NullValueHandling = NullValueHandling.Ignore;
});
Then, create a new NoCache attribute to indicate to the browser that the responses of the actions where you use this attribute are no cacheable. This is required because the browser might save the result in the cache and you will not be able to see the updated responses.
namespace MyAngular2BaseApp.Infrastructure
{
  using System;
  using Microsoft.AspNet.Mvc.Filters;

  [AttributeUsage(AttributeTargets.Class | AttributeTargets.Method)]
  public sealed class NoCacheAttribute : ActionFilterAttribute
  {
    public override void OnResultExecuting(ResultExecutingContext context)
    {
      context.HttpContext.Response.Headers["Cache-Control"] = "no-cache, no-store, max-age=0";
      context.HttpContext.Response.Headers["Pragma"] = "no-cache";
      context.HttpContext.Response.Headers["Expires"] = "-1";

      base.OnResultExecuting(context);
    }
  }
}
Create an ASP.NET Core API Controller, which is a simple Controller. In this controller, add the Get method with the HttpGet attribute that returns the list of string values. Make sure to include the [Produces("application/json")] attribute in your controller and the [NoCache] attribute in your GET methods.
namespace MyAngular2BaseApp.Controllers
{
using System.Collections.Generic;
using Microsoft.AspNet.Mvc;
using MyAngular2BaseApp.Infrastructure;
[Produces("application/json")]
[Route("api/[controller]")]
public class ValuesController : Controller
{
// GET: api/values
[NoCache]
[HttpGet]
public IEnumerable<string> Get()
{
return new string[] { "value1", "value2" };
}
}
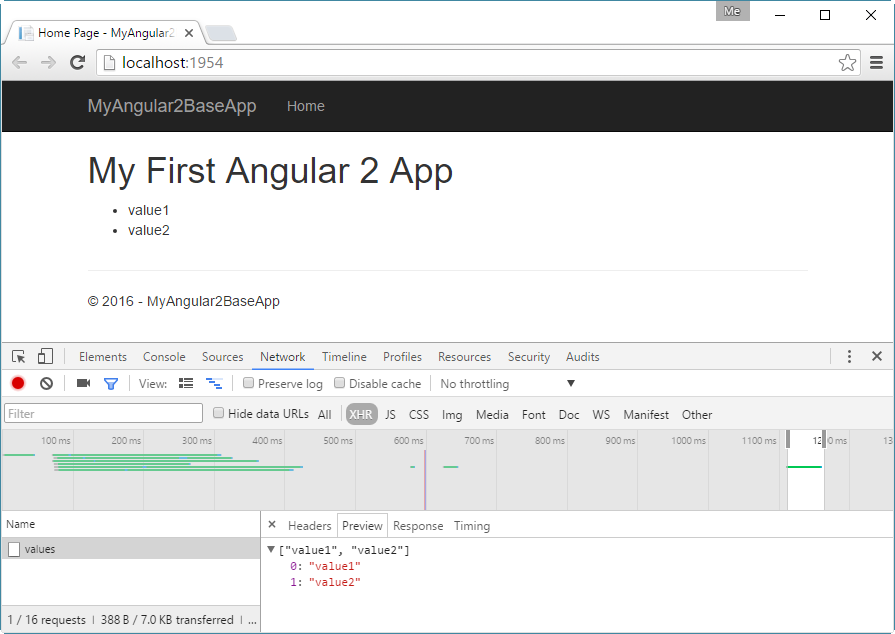
}If you run the solution now, you will be able to see the following image. Note that there is a request to the Controller API that get the values.
Now you have the two keys elements in place for a Single Page Application using Angular 2 and ASP.NET Core. You can find the full code in my Angular2ASPNETCoreBaseApp repository at the http-sample branch. In case you want both, routing and http, configure you can take a look at the full-sample.

