Build and deploy a React App with multi-stage pipelines

Nowadays, it's super easy and cheap to have a quick modern site deployed with Continuous Integration and Continuous Deployment. In this post we will see one of the options by reviewing how to create a react app, configure multi-stage pipelines to build and deploy the site to an Azure Blob Storage with static site enabled.
Getting started
Let's start by creating a simple react.js application using the create-react-app command. The only thing that you will need to have installed to run the following command is npm 5.2+.
npx create-react-app react-sampleNow that you have the base structure of the site, let's install the dependencies with npm install which will generate the package-lock.json file. Finally, push the folder to a git repository (e.g. a GitHub repository). You can even test the site running npm start
After that, let's configure the Continuous Integration and Continuous Deployment by creating the Azure Pipeline configuration.
Configuring Azure Storage
In order to have deploy the site we need a blob storage configured as static site. First, create a new storage account and be sure to select a Storage v2 on the account kind option.
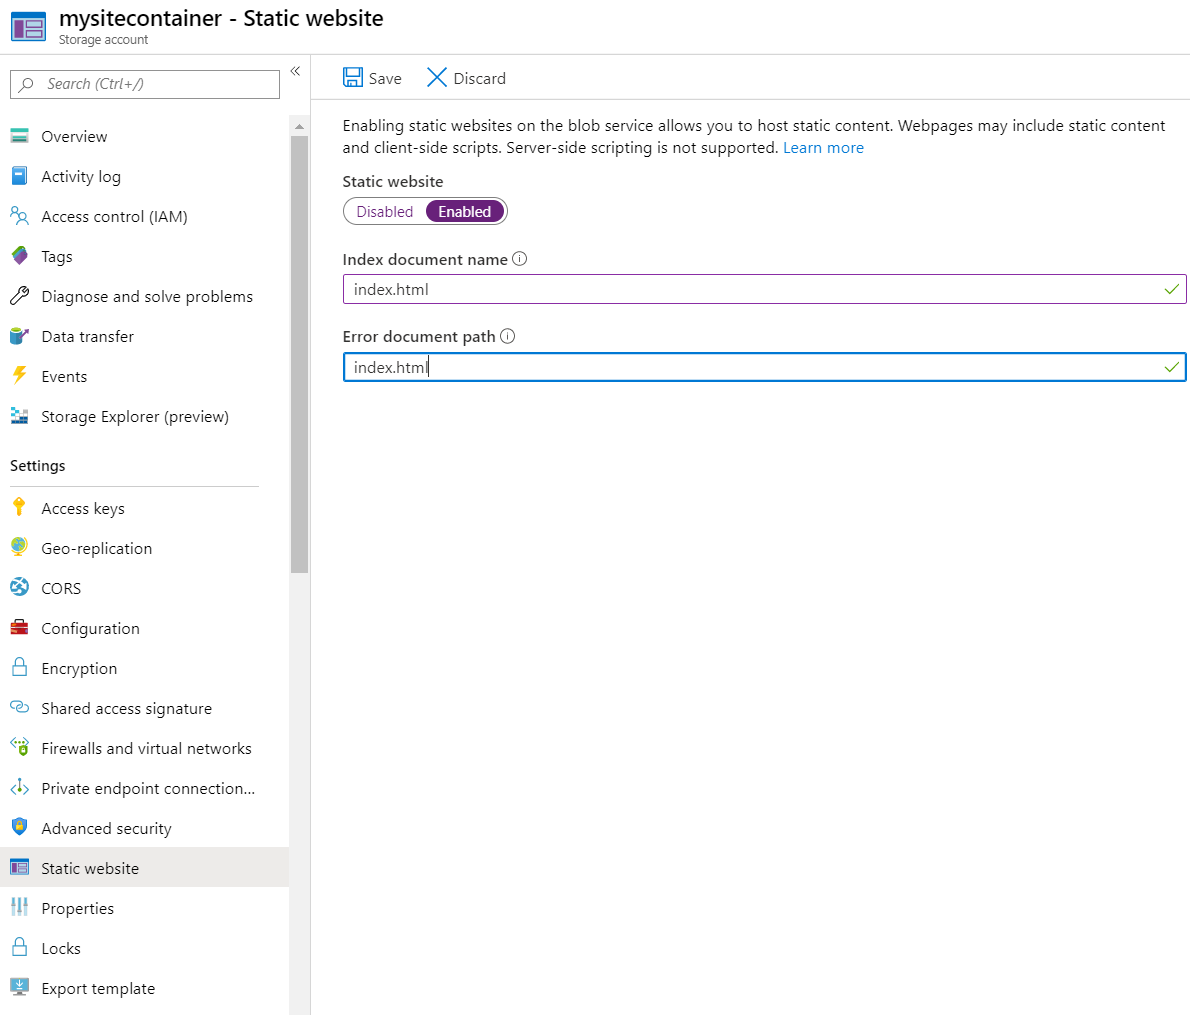
Once the new storage is created, go to the settings section and look for the Static website option. On the static website panel click Enabled and set index.html as both Index document name and Error document path.
Note that setting the Error document path is a workaround for single page applications where you are handling the routing on the front end, in this case with something like react-router. However, the status code for the routes that are not in the root path, will return 404 instead of 200, giving you some problems if you are worried about SEO. You can prevent this using other Azure Services in front of the site such as Azure CDN.
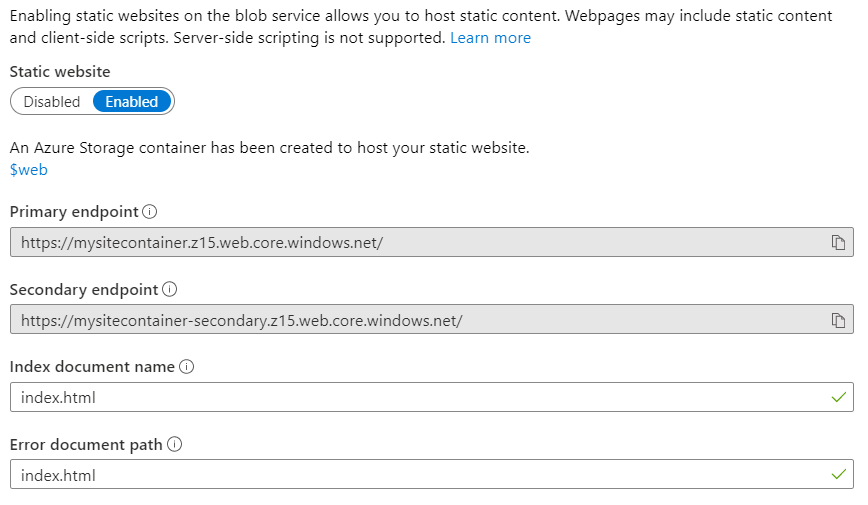
Once you click save, the panel will be updated with the primary and secondary endpoint of the site.
Configuring Azure Pipelines
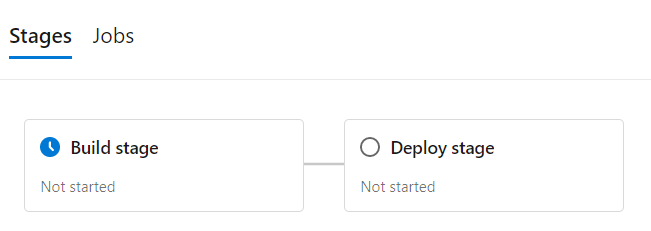
In a previous post, I gave a quick introduction to Azure Pipelines with a single stage pipeline that build a gatsbyjs site. In addition to that, I used the Release to deploy that to firebase. Now the idea is to use a multi-stage pipeline to perform both actions using the same azure-pipelines.yml file.
The structure of the file for a multi-stage pipeline is a bit different, but the base ideas are the same. We will have the trigger property and we can also have pr and variables configured, all of that in a similar way as in the single-stage pipeline. Then, instead of having the job configuration (i.e. pool, steps, etc.), we will have the list of stages, each of the entries will have the stage identifier, a display name and a list of jobs.
Additionally, you can make that one stage depends on another one adding the dependsOn: { stageIdentifierHere } entry with the condition: succeeded(), this will be super useful for our scenario where we only want to deploy if the build stage successes.
trigger:
- master
pr: none
variables:
# ...
stages:
- stage: Build
displayName: Build stage
jobs:
- job: BuildSite
displayName: Build Site
pool:
vmImage: $(vmImageName)
steps:
# ...
- stage: Deploy
displayName: Deploy stage
dependsOn: Build
condition: succeeded()
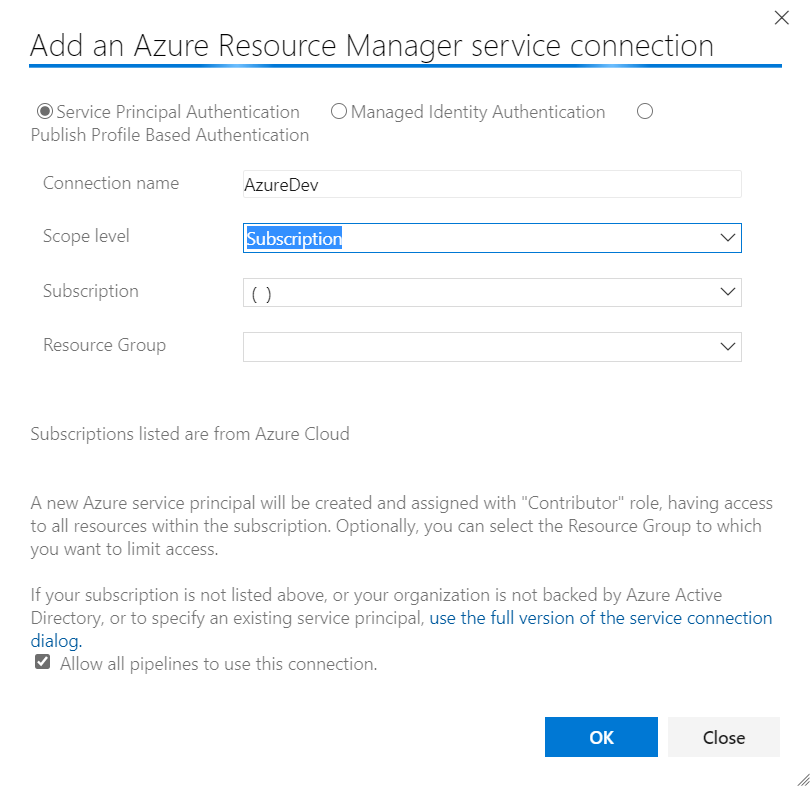
jobs: #....Let's include a few variables that we will use in the rest of the yaml file. First, one named azureSubscription that will contain the name of the connected service of the Azure Subscription. You will need to go to the DevOps project settings and add a new service connection targeting the Azure Resource Manager service. Use the Service Principal Authentication and complete the form with your information. The connection name is the one that you will use in the variables.
Now, let's add three new variables clientBlobAccountName, vmImageName and apiDomain. The first one is the name of the Azure storage that you will use to deploy the site. The second one is the name of the image that we will use in all the jobs. Finally, the apiDomain variable will be a sample of how we can configure the site in this case configuring which api url will be using.
#...

variables:
  # Subscription needs a storage account
  azureSubscription: 'AzureDev'

  # This needs to have a static website setup with the default container ($web)
  clientBlobAccountName: 'mysitecontainer'

  # We build on linux to remove any dependancies on windows stuff / can move to GCP or AWS
  vmImageName: 'ubuntu-latest'

  # A sample url to be consumed from the react app as environment variable
  apiDomain: 'http://dummy.restapiexample.com/api/v1/'
#...
The build stage
Now that we have the base structure of the file, we will add the build stage job. The idea for this job is the following:
- Install node.js
- Run a bash script to install dependencies and run the npm's build task.
- Copy the output files to the ArtifactStagingDirectory.
- Create a zip file with all the generated files.
- Publish the zip file as artifact.
The result would be something like the following.
#...

stages:
  - stage: Build
    displayName: Build stage
    jobs:
      - job: BuildSite
        displayName: Build Site
        pool:
          vmImage: $(vmImageName)

        steps:
          - task: NodeTool@0
            inputs:
              versionSpec: '12.x'
            displayName: 'Install Node.js'

          - script: |
              npm ci
              npm run build --if-present
            displayName: 'npm install, build'
            env:
              CI: true
              REACT_APP_API_DOMAIN: '$(apiDomain)'

          - task: CopyFiles@2
            inputs:
              SourceFolder: '$(System.DefaultWorkingDirectory)/build/'
              Contents: |
                $(System.DefaultWorkingDirectory)/build/**/*
              TargetFolder: '$(Build.ArtifactStagingDirectory)/output-site'
            displayName: 'Copy site files to artifact directory'

          - task: ArchiveFiles@2
            displayName: 'Archive files'
            inputs:
              rootFolderOrFile: '$(Build.ArtifactStagingDirectory)/output-site'
              includeRootFolder: false
              archiveType: zip
              archiveFile: $(Build.ArtifactStagingDirectory)/$(Build.BuildId)-Site.zip
              replaceExistingArchive: true

          - task: PublishPipelineArtifact@0
            displayName: 'Publish site pipeline artifacts'
            inputs:
              artifactName: '$(Build.BuildId)-Site'
              targetPath: $(Build.ArtifactStagingDirectory)/$(Build.BuildId)-Site.zip
# ...
Note that when we run the npm install, build script we are configuring an environment variable named REACT_APP_API_DOMAIN with the apiDomain variable value that we defined before. We can consume this variable from the react app using process.env.REACT_APP_API_DOMAIN and it will be replaced with the value of the environment variable when you run the build script.
The deploy stage
Now that we have the drop with the files, we only need to deploy it and to do that, we need to upload the content of the zip file to the $web container of the Azure Storage that we created before.
For the pipeline configuration, we will configure a special kind of job. We need to set deployment instead of job and then, it will have a strategy with runOnce as shown below.
The steps, are the following:
- Download the artifact that contained the generated files.
- Extract the files to the DefaultWorkingDirectory.
- Use the Azure CLI to upload the files to storage.
# ...

stages:
  - stage: Build
  # ...

  - stage: Deploy
    displayName: Deploy stage
    dependsOn: Build
    condition: succeeded()
    jobs:
      - deployment: DeploySite
        displayName: Deploy Site Production
        environment: 'production'
        pool:
          vmImage: $(vmImageName)
        strategy:
          runOnce:
            deploy:
              steps:
                - task: DownloadPipelineArtifact@1
                  displayName: 'Download Pipeline Artifacts'
                  inputs:
                    artifactName: '$(Build.BuildId)-Site'
                    buildType: 'current'

                - task: ExtractFiles@1
                  inputs:
                    archiveFilePatterns: '$(System.ArtifactsDirectory)/$(Build.BuildId)-Site.zip'
                    destinationFolder: '$(System.DefaultWorkingDirectory)/unzip/$(Build.BuildId)-Site'
                    cleanDestinationFolder: true

                - task: AzureCLI@2
                  inputs:
                    azureSubscription: '$(azureSubscription)'
                    scriptType: 'bash'
                    scriptLocation: 'inlineScript'
                    inlineScript: 'az storage blob upload-batch -d "\$web" --account-name "$(clientBlobAccountName)" -s "$(System.DefaultWorkingDirectory)/unzip/$(Build.BuildId)-Site/"'
Note that the azureSubscription variable is used as parameter of the AzureCLI task.
Once everything is ready, commit and push the new file to the repository. Navigate to the Azure Pipeline portal and add a new pipeline targeting the repository where you pushed everything. The yml file will be detected and you can perform a first deployment by clicking the run button.
Summing up
You should now have your site up and running. Every time you push content to your repository it will be automatically deployed to that site. And one of the best things is that this scales even better than an App Service and it's much cheaper.
For more information, you can always go to the Azure Pipeline documentation and the Static website hosting documentation.
You can find the full azure-pipeline.yml file in my react-sample repository.

